Red Beans and Rice

This recipe was originally posted by Damn Delicious. They cook great dishes if you haven’t checked them out.

Prep Time: 20 minutes Cook Time: 40 minutes Total Time: 1 hr

Yield: 6-8 servings

Red Beans & Rice

Ingredients:

  • 1 cup basmati rice
  • 1 Tbsp vegetable oil
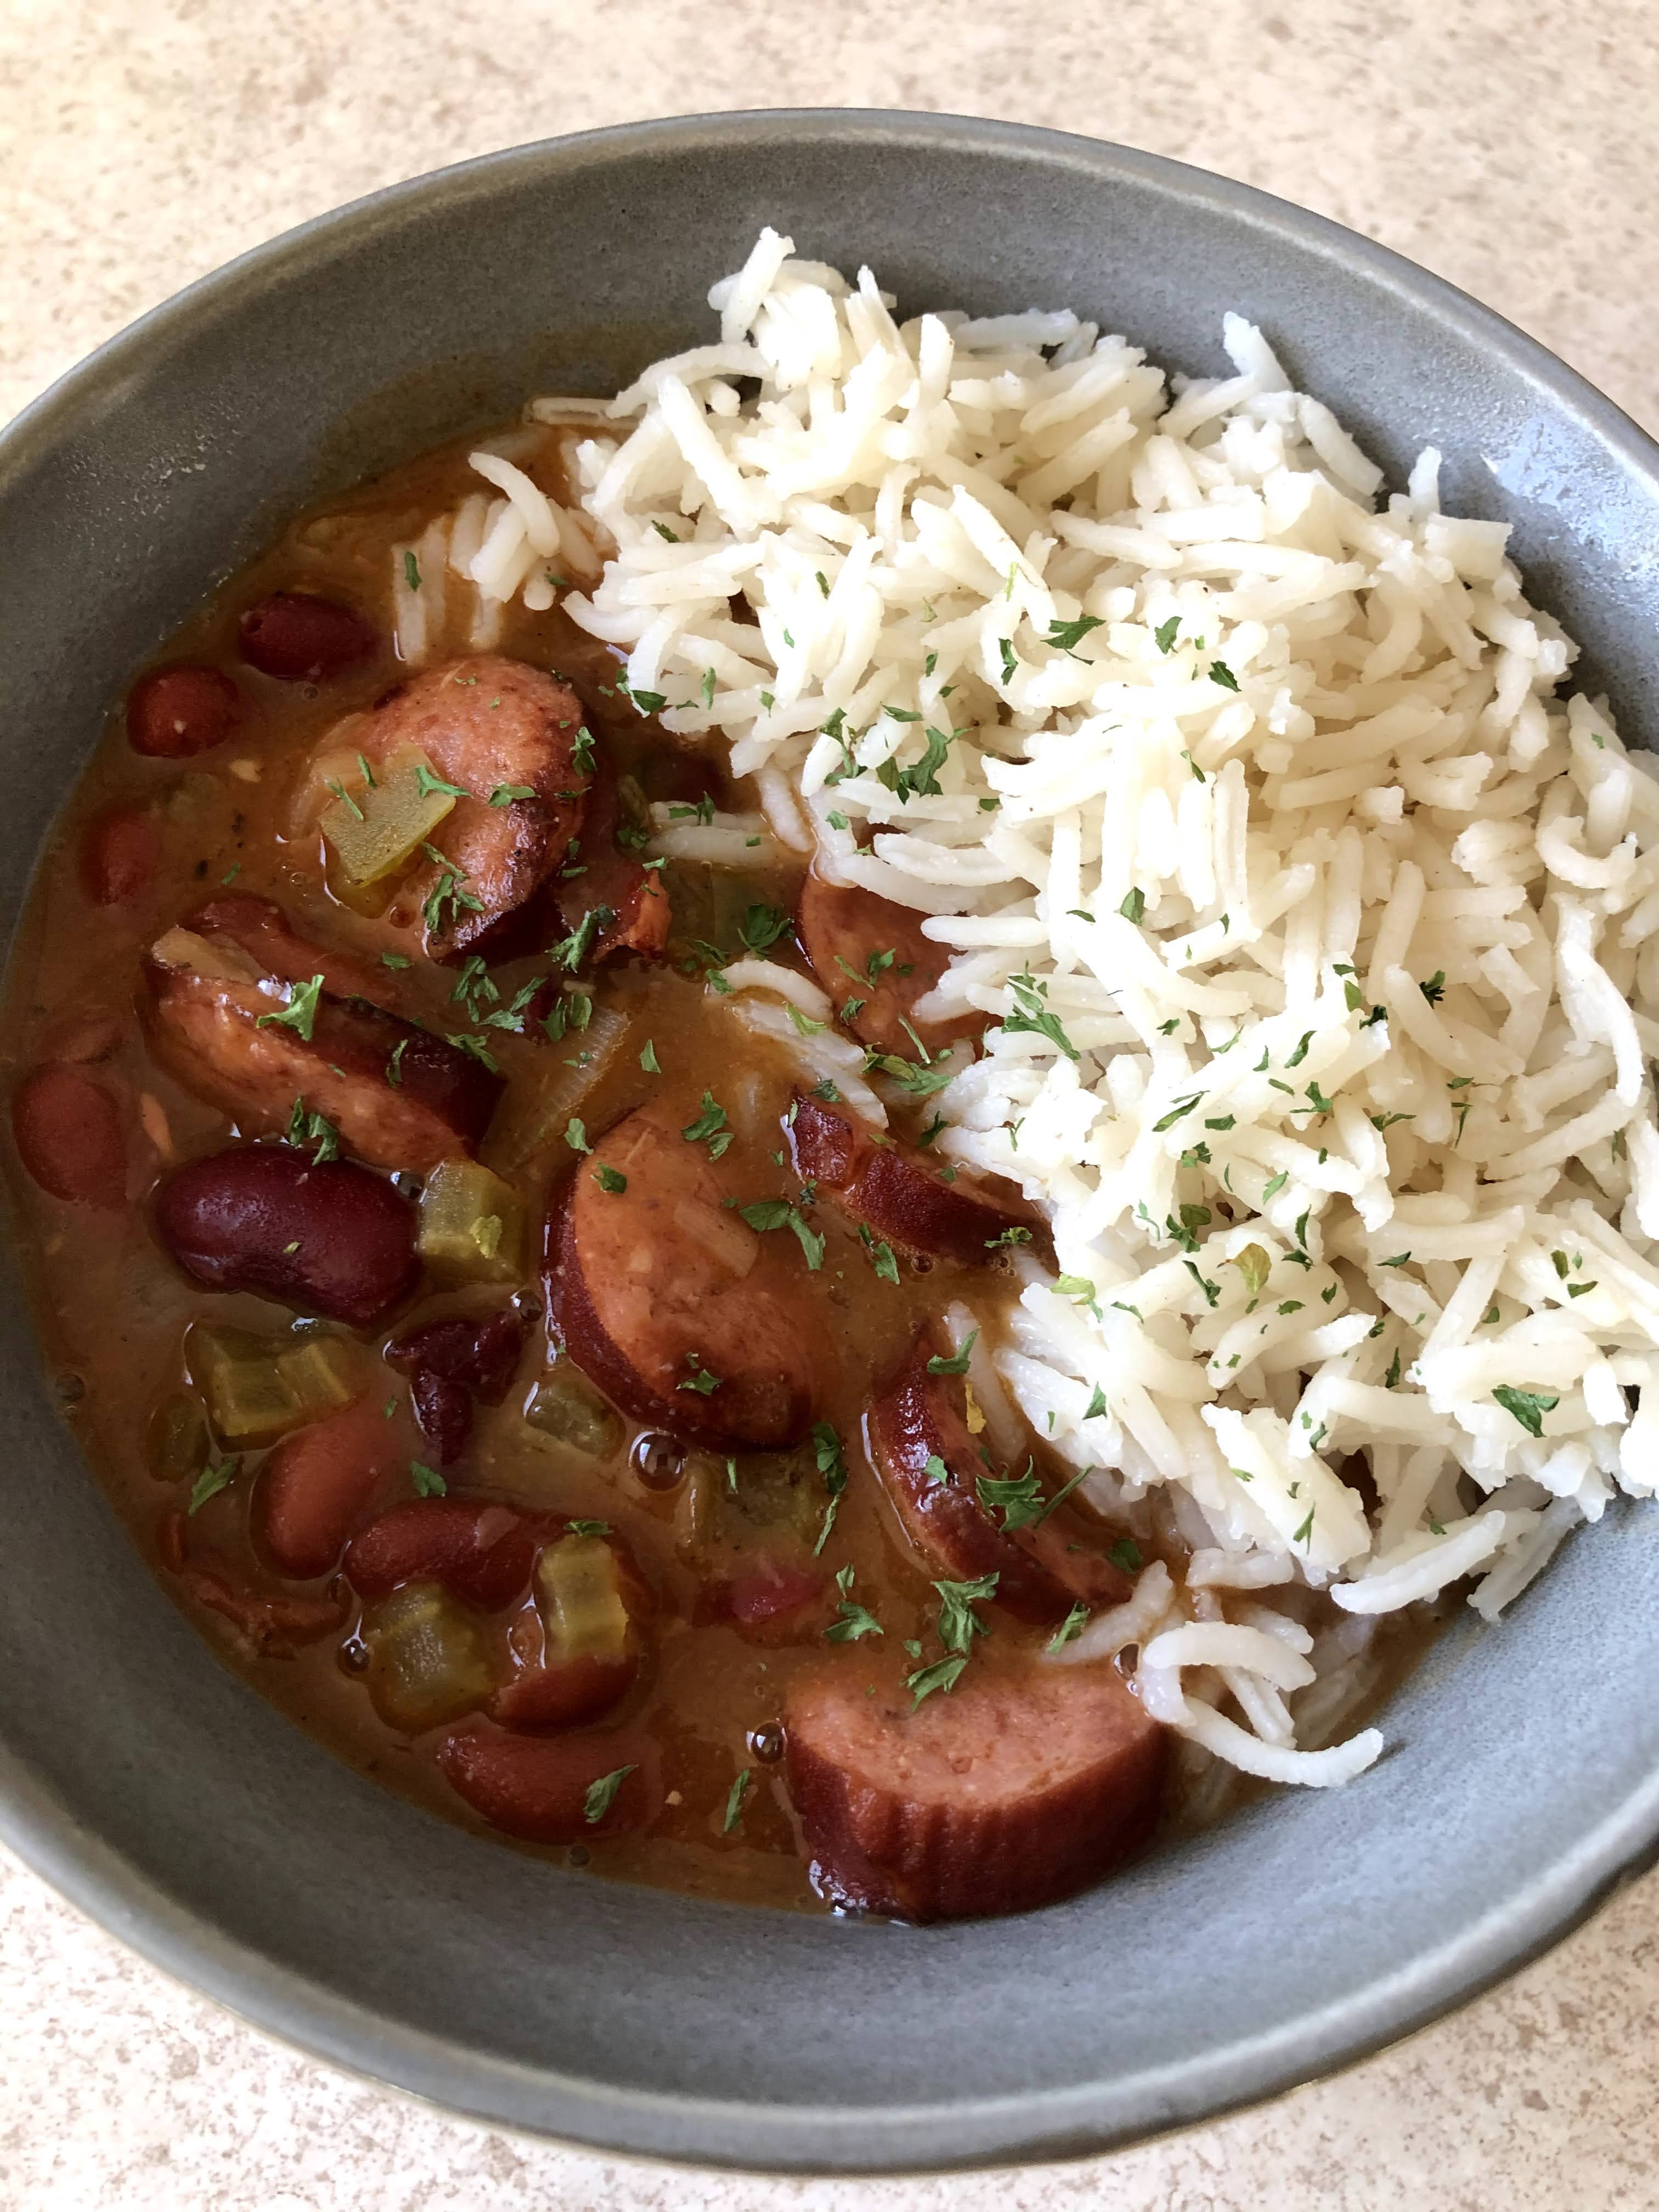
  • 1 (12.8 oz) package smoked andouille sausage or kielbasa cut into thin slices.
  • 1 medium sweet onion, diced
  • 1 green bell pepper, diced
  • 2 celery ribs, diced
  • 2 Tbsp tomato paste
  • 2 cloves garlic, minced
  • 1 1/2 tsp Cajun seasoning, salt-free
  • 3 (15 oz) cans red beans, drained and rinsed
  • 3 cups chicken stock
  • 1 tsp hot sauce
  • 1 bay leaf
  • Salt & pepper to taste

Instructions:

  1. Cook rice according to package directions; set aside/
  2. Heat vegetable oil in a large stockpot of Dutch oven over medium heat. Working in batches, add sausage, and cook, stirring frequently, until sausage is lightly browned, about 3-4 minutes; set aside.
  3. Add onion, bell pepper, and celery. Cook, stirring occasionally, until tender, about 3-4 minutes.
  4. Stir in tomato paste, garlic, Cajun seasoning until fragrant, about 1 minute.
  5. Stir in red beans, chicken stock, hot sauce, bay leaf, and sausage; season with salt and pepper to taste. Bring to a boil; cover; reduce heat and simmer for 15 minutes. Uncover and continue to simmer until reduced, an additional 15 minutes.
  6. Using a wooden spoon, mash beans against the side of the pot until slightly thickened. Season with salt and pepper to taste.
  7. Serve immediately, topped with rice and garnished with parsley if desired.

Tips & Tricks

  • This recipe really is best with a long grain rice like basmati. Try not to substitute.
  • Side dish suggestions: corn bread with a hot honey glaze (ex: Mike’s Hot Honey).

Korean BBQ Tacos with Kimchi

This recipe was originally featured on The Oven Light. This is a crockpot recipe, plan ahead accordingly!

Korean BBQ Tacos

Ingredients:

  • For the Pulled Pork
    • 2-3 lb pork shoulder/butt
    • 1/2 cup reduced sodium soy sauce
    • 1/2 cup water
    • 1 tsp sesame oil
    • 1 Tbsp rice vinegar
    • 3 cloves minced garlic
    • 1/2 tsp pepper
  • For the Korean BBQ Sauce (worth doubling)
    • 1/4 cup low sodium soy sauce
    • 1/4 cup water
    • 1/4 cup brown sugar
    • 1 clove minced garlic
    • 1 Tbsp rice vinegar
    • 1 tsp sesame oil
    • 1/2 tsp ground ginger
    • 1/4 tsp black pepper
    • 2 tsp chili paste
    • 1 Tbp cornstarch
    • 2 Tbsp water
  • For the Quick Kimchi
    • 16 oz bag shredded cabbage (or 6 cups)
    • 3 Tbsp canola oil
    • 6 Tbsp rice vinegar
    • 2 tsp chili paste
    • 1/2 tsp ground ginger
    • 3 Tbsp granulated sugar
    • 1 1/2 tsp sesame oil
    • salt & pepper
  • For Serving
    • Tortillas (taco-sized)
    • Queso fresco
    • Diced green onion
    • Sesame seeds (optional)

Instructions:

For the Pork:

  1. Place the pork shoulder in the slow cooker. In a separate bowl, stir together the remaining ingredients. Pour over pork, cover and cook for 8 hours on low or 4 on high until tender.
  2. Shred with a fork and return meat to slow cooker to soak up sauce.
  3. Optional: Turn on broiler in oven or take some meat in a pan on the stove to crisp up.

For the BBQ Sauce

  1. Add all ingredients, except for the cornstarch and 2 Tbsp water to a skillet over medium heat. Bring to a boil. In a separate bowl, combine cornstarch and water and mix until cornstarch is dissolved. Add to the sauce and boil until sauce thickens (a few minutes).
  2. Remove from heat and set aside to serve.

For the Quick Kimchi

  1. Place cabbage in a large bowl. Set aside. In a small bowl, combine the rest of the ingredients. Pour over the cabbage and mix well. Set aside for serving right away, or store in an airtight container until ready.

Assembly

  1. Build your tacos with pork, sauce, kimchi, and other toppings as desired.
  2. Side dish recommendation: cilantro lime rice.

Mongolian Beef with Ramen Noodles

This recipe was adapted from Jo Cooks.

Mongolian Beef with Ramen Noodles

Ingredients:

  • 1 1/2 lb flank steak
  • 1/4 cup cornstarch
  • 1/4 cup vegetable oil
  • 2 green bell peppers, sliced into strips
  • 8-9 oz ramen noodles, uncooked
  • 3 green onions, chopped
  • For Sauce:
    • 2 Tbsp sesame oil
    • 3/4 cup low sodium soy sauce
    • 1/3 – 1/2 cup brown sugar (depending on your taste)
    • 1 1/4 cup chicken broth
    • 1 Tbsp minced garlic
    • 1/4-1/2 tsp red pepper flakes
    • Chili oil (optional)

Instructions:

  • Slice the flank steak into thin strips against the grain. Depending on the width of your steak, cut the strips in half. Place sliced steak and cornstarch into a Ziplock bag and shake to coat each piece.
  • In a non-stick skillet with high walls, heat the oil. When the oil is hot, add beef and cook until browned. Complete in batches as to not overcrowd the pan and to avoid having pieces stick together. Adjust the heat of the oil and add more if necessary inbetween batches. I recommend having a splatter guard on hand if you have one (or use a metal colander upside down if it will fit on top of your pan). Remove beef from pan when cooked and set onto a plate.
  • Add the bell pepper to the skillet and sauté it for a couple minutes until it starts to get soft. Remove the pepper from the skillet and set aside on a plate.
  • In the same skillet, add sauce ingredients. Stir and cook over medium heat until sauce thickens and reduces by about a quarter (about 10-15 minutes).
  • In a separate pot, cook the ramen noodles for 1 minute less than package instructions. I have found fully cooking them leads to soggy noodles once the dish is put together. Run the noodles under room temp water to stop the cooking process but not chilling them as much as cold water would.
  • Once sauce is reduced, return the beef, bell pepper, and noodles to the pan and toss to coat. Top with green onion and serve.

Tips & Tricks:

  • While leftover beef will keep pretty well, the ramen noodles won’t reheat as nicely. If you plan on having leftovers, consider not making all the noodles right away and save a package to make fresh the next day.

Cheesy Chicken & Broccoli Braid

This recipe was originally featured on Food, Family & Finds.

Cheesy Chicken & Broccoli Braid

Ingredients:

  • 2 Pillsbury Crescent Rolls cans
  • 1/2 Rotisserie Chicken shredded (about 2 cups)
  • 2 cups shredded cheddar cheese
  • 2 cups broccoli, steamed and chopped (1 frozen steamer bag of florets)
  • 1/2 cup mayo
  • 1 egg yolk
  • Rosemary (fresh or dried)

Instructions:

  1. Preheat oven to 375°.
  2. On a baking sheet lined with parchment paper, roll out both cans of crescent roll dough so they align along their long side make one bigger, wide rectangle.
  3. Press the seams together to seal dough together.
  4. Combine chicken, cheese, broccoli, and mayo in a large bowl.
  5. Spread mixture down the center of the crescent roll dough evenly.
  6. Cut horizontal strips, about 1 inch wide, from the sides of the crescent roll dough to where the chicken mixture is in the center.
  7. Fold the strips over the top of the chicken mixture, switching the left and right to mimic a braid.
  8. Brush the egg yolk over the top of the braid and sprinkle with rosemary.
  9. Bake for about 30 minutes until the dough is golden brown.

Tips & Tricks:

  • I recommend using only broccoli florets for this recipe.
  • Stick with the baking time until the dough is really golden or else you could end up with some soggy dough towards the center of the braid.

Cheesy Beef and Shells

This recipe was originally featured on Damn Delicious.

Prep Time: 15 min Cook Time: 25 min Total Time: 40 min

Cheesy Beef & Shells

Ingredients:

  • 8-oz medium pasta shells (1/2 box)
  • 1 Tbsp olive oil
  • 1 lb ground beef
  • 1/2 medium yellow onion, diced
  • 2 cloves garlic, minced
  • 1 1/2 tsp Italian seasoning
  • 2 Tbsp flour
  • 2 cups beef stock
  • 1 15-oz can tomato sauce
  • 3/4 cup heavy cream
  • Salt & pepper, to taste
  • 1 1/2 cups shredded extra-sharp cheddar cheese

Instructions:

  1. In a large pot of boiling salted water, cook pasta according to package instructions; drain.
  2. Heat olive oil in a large skillet over medium high heat. Add ground beef and cook until browned, about 3-5 minutes; drain excess fat. Set aside.
  3. Add onion to the skillet, and cook, stirring frequently, until translucent, about 2-3 minutes. Stir in garlic, and Italian seasoning, until fragrant, about 1 minute.
  4. Whisk in flour until lightly browned, about 1 minute.
  5. Gradually whisk in beef stock and tomato sauce. Bring to a boil; reduce heat and simmer, stirring occasionally, until reduced and slightly thickened, about 6-8 minutes.
  6. Stir in pasta, beef, and heavy cream until heated through. about 1-2 minutes; season with salt and pepper, to taste. Stir in cheese until melted, about 2 minutes.

Butternut Squash Black Bean Enchiladas

This recipe was originally featured on Minimalist Baker.

Prep Time: 20 min Cook Time: 55 min Total time: 1 hr 15 min

Ingredients:

Butternut Squash and Black Bean Enchiladas
  • Enchiladas
    • 3 cups cubed butternut squash (1/2 average size squash)
    • 1 Tbsp olive oil
    • salt & pepper
    • 1 15-oz can black beans (drained)
    • 1/2 tsp ground cumin
    • 9-10 tortillas
  • Sauce
    • 1 Tbsp olive oil
    • 3 cloves garlic, minced
    • 1 15-oz can tomato sauce
    • 1 chipotle pepper in adobo sauce (plus extra sauce if you want more heat/smokiness)
    • 1/2 cup vegetable broth
    • Salt & pepper
    • 1-2 Tbsp maple syrup
  • Toppings (optional)
    • Red onion, diced
    • Avocado, sliced
    • Cilantro, chopped
    • Lime juice

Instructions:

  1. Preheat oven to 400 °F.
  2. Add cubed butternut squash to a baking sheet, lined with aluminum foil, and drizzle with olive oil, salt and pepper. Toss to combine.
  3. Bake for 15-20 minutes or until squash is fork tender. Set aside. Reduce oven heat to 350°.
  4. In the meantime, prepare sauce. Heat large skillet over medium heat. Add oil and garlic once hot. Cook stirring frequently, until soft and slightly browned.
  5. Remove pan from heat and add tomato sauce, diced chipotle pepper, more adobo sauce (if wanted), and vegetable broth. Reduce heat to low and return pan to heat. Simmer for 5 minutes, covered (to reduce splattering).
  6. Transfer sauce to a blender and blend until completely smooth. Taste and adjust as necessary. Add more adobo sauce for heat, maple syrup for sweetness. Set aside.
  7. Place the same skillet used earlier over medium heat and add black beans. Season with salt, pepper, cumin and stir.
  8. Once bubbling, remove from heat and add roasted squash and 1/4 cup of the sauce. Stir to coat. Taste and adjust seasonings as needed. Set aside.
  9. Pour a bit of sauce into the bottom of a 9×13 inch baking dish. Spread to coat.
  10. Take a tortilla, and lay it down in the dish. fill with generous amount of filling, then roll up tortilla. Place seam side down at one end of the dish. Continue with remaining tortillas and filling. Pour remaining sauce over the top of the tortillas, spreading it into the cracks.
  11. Bake at 350° for 15-20 minutes or until warmed through. Top with desired toppings and serve.

Honey Garlic Chicken Sheet Pan

This recipe was originally featured on Damn Delicious.

Prep Time: 10 minutes Cook Time: 35 minutes Total Time: 45 minutes

Honey Garlic Chicken Sheet Pan

Ingredients:

  • 3 Tbsp olive oil, divided
  • 2 Tbsp unsalted butter, melted
  • 2 Tbsp honey
  • 2 Tbsp brown sugar
  • 1 Tbsp Dijon mustard
  • 3 cloves garlic, minced
  • 1/2 tsp dried oregano
  • 1/2 tsp dried basil
  • Salt & pepper, to taste
  • 1 lb baby red potatoes, halved
  • 4 boneless, skinless chicken breasts
  • 24 oz broccoli florets (1-2 heads cut into florets)
  • Dried parsley (garnish)

Instructions:

  1. Preheat oven to 400°F. Spray a large baking sheet with nonstick spray or oil.
  2. In a small bowl, whisk together 2 Tbsp olive oil, honey, brown sugar, Dijon mustard, garlic, oregano, and basil; season with salt and pepper. Set aside.
  3. Place potatoes in a single layer onto the prepared baking sheet. Drizzle with remaining 1 Tbsp olive oil and season with salt and pepper, to taste. Add chicken in a single layer, and brush each chicken breast with honey mixture.
  4. Place into oven and roast until chicken is completely cooked through, reaching an internal temperature of 165°, about 25-30 minutes. Stir in broccoli during the last 10 minutes of cooking time. Then broil for 2-3 minutes until caramelized and slightly charred.
  5. Serve immediately, garnished with parsley, if desired.

Tips & Tricks:

  • If you are able to coat each chicken breast with the honey garlic mixture and still have some leftover, I save that extra until I add the broccoli to the sheet pan then drizzle it over.
  • I recommend using a Bluetooth meat thermometer inserted into the center of a chicken breast so you can be certain your chicken is cooked through. If you have larger chicken breasts it will help you adjust your cooking time and when you should add the broccoli.

Spinach, Artichoke, and Goat Cheese Quiche

This recipe was originally featured on foodiecrush.

Prep Time: 15 min Cook Time: 50 min Total Time: 1 hour, 5 min

Spinach, Artichoke, and Goat Cheese Quiche

Ingredients:

  • 1 package refrigerator pie dough
  • 1 Tbsp butter
  • 1 leek, thinly sliced, white and light green parts only
  • 1 (15 oz) can artichoke quarters, drained and chopped
  • 1 1/2 cups fresh spinach
  • 1/2 tsp salt
  • 6 eggs
  • 1 1/4 cup milk of choice
  • 1/2 tsp ground mustard
  • 1/2 tsp ground nutmeg
  • 2 oz goat cheese

Instructions:

  1. Preheat oven to 375°F.
  2. Roll out the pie dough and line a 9-inch pie pan with the dough, then place back in fridge to keep chilled.
  3. Melt butter in a skillet over medium heat. Add the leeks and cook until softened, about 5 minutes, stirring often to avoid burning. Add the artichoke hearts to the pan and cook another 2 minutes. Stir in the spinach, season with salt and pepper, and remove from the heat. Stir so spinach will wilt when mixed with the warm vegetables. Set aside to cool.
  4. Whisk the eggs and milk with the mustard and nutmeg. Pull the pie tin from the fridge and fill with the cooked vegetables. Top with half of the goat cheese (torn into small bits). Pour the egg mixture over the vegetables and top with remaining goat cheese.
  5. Bake for 45-55 minutes or until the egg is puffed and no longer jiggly. Remove from the oven and let rest 10 minutes. Serve warm or at room temperature.

Tips & Tricks:

  • The ingredients I purchased from the store set me up perfectly for making two quiches (two pie crusts in a package, 4 oz goat cheese, eggs are easier to get in a dozen….). This recipe will only feed about 4 realistically so if you are making it for a special occasion, I recommend going double.
  • I chopped my artichoke hearts but the original recipe only called for quartering them.
  • I like to roughly tear my spinach before mixing it into a recipe, sometimes the leaves are still quite big even after wilting if you don’t buy baby spinach.
  • This recipe reheats ok but not great. It will help if you don’t put it in the fridge still warm but try to finish it for the meal you make it for.

Chicken Lettuce Wraps

This recipe was originally featured on Damn Delicious.

Prep Time: 10 min Cook Time: 10 min Total Time: 20 min

Chicken Lettuce Wraps

Ingredients:

  • 1 Tbsp olive oil
  • 1 pound ground chicken
  • 2 cloves garlic, minced
  • 1 onion, diced
  • 1/4 cup hoisin sauce
  • 2 Tbsp soy sauce
  • 1 Tbsp rice wine vinegar
  • 1 tsp ground ginger (or 1 Tbsp freshly grated)
  • 1 Tbsp Sriracha
  • 1 (8-oz) can water chestnuts, drained and diced
  • 2 green onions, thinly sliced
  • Salt & Pepper
  • 1 head butter lettuce (or similar), washed

Instructions:

  1. Heat olive oil in a saucepan over medium high heat. Add the ground chicken and cook until browned. Drain excess fat.
  2. Stir in garlic, onion, hoisin sauce, soy sauce, rice wine vinegar, ginger, and sriracha until onions have become translucent, about 1-2 minutes.
  3. Stir in water chestnuts and green onion until tender, about 1-2 minutes. Season with salt and pepper, to taste.
  4. To serve, spoon chicken mixture into the center of a lettuce leaf.

Roasted Vegetable Pasta Salad w/ Shrimp

This recipe was originally featured on Walder Wellness.

Prep Time: 10 min Cook Time: 35 min Total Time: 45 min

Roasted Vegetable Pasta Salad w/ Shrimp

Ingredients:

  • 1 bag frozen sweet corn
  • 1.5 cups cherry tomatoes
  • 1 large red bell pepper (julienned)
  • 2 Tbsp EVOO (for vegetables)
  • 1.5 cup dry bowtie pasta
  • 1 bag medium uncooked shrimp (peeled, deveined, tail-off)
  • 1 Tbsp EVOO (for shrimp)
  • 2 large handfuls baby arugula
  • 1 large handful fresh basil, freshly chopped
  • Salt & Pepper
  • For Salad Dressing:
    • 3 Tbsp EVOO
    • 2 Tbsp white wine vinegar
    • 1 clove garlic, minced
    • 1/2 tsp dijon mustard
    • 1/4 tsp honey
    • 1/2 tsp dried basil
    • Salt & pepper to taste

Instructions:

  1. Preheat oven to 400°F.
  2. Toss bell pepper, cherry tomatoes, corn with EVOO and some salt. Spread onto a lined baking sheet. Roast in oven for about 20-25 minutes, turning half-way through.
  3. Bring a pot of water to a boil and cook pasta according to package directions.
  4. Meanwhile make pasta salad by adding all dressing ingredients to a small jar with a lid. Shake ingredients together well. Season to adjust.
  5. Prepare and dry shrimp with a paper towel. In a large pan, add EVOO and cook shrimp for 1-2 minutes on each side until opaque. Remove from heat.
  6. Remove veggies from oven and allow to cool for a few minutes. Drain pasta once done, and add to large mixing bowl along with shrimp and arugula.
  7. If eating immediately, drizzle with dressing or else dress before serving.

Tips & Tricks:

  • Lettuce and pasta together seems weird, but it somehow works for this and leaves you feeling full longer than a traditional lettuce salad.
Design a site like this with WordPress.com
Get started